where baking meets the passion for fashion and photography

Saturday 24 November 2012

Birthday Cake Recipes for Dear Friends - Rainbow Cake

Image


The most special birthday present is a hand-baked birthday cake. I was looking for the most unexpected birthday cake recipe and I came across the rainbow cake by Martha Stewart http://www.marthastewart.com/256688/rainbow-cake

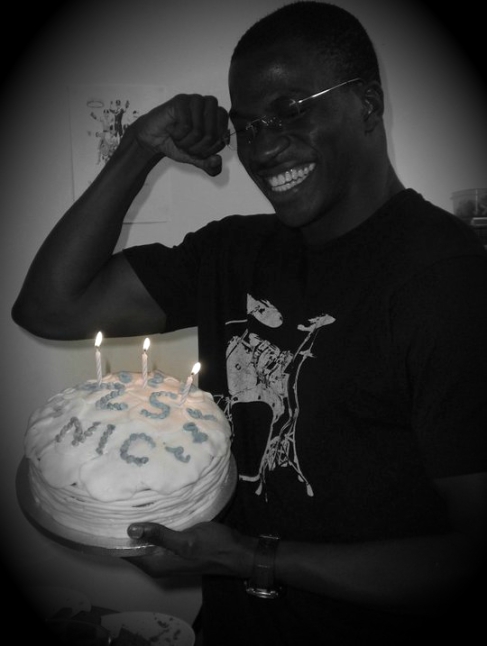
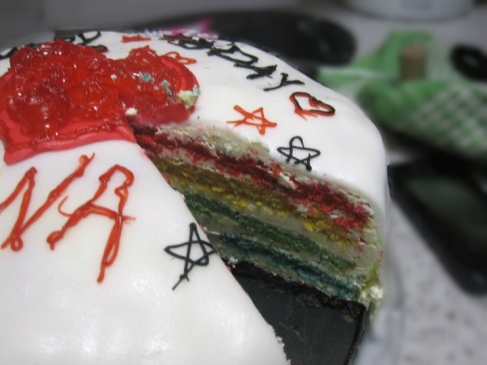
You can find plenty of nice ideas for birthday cake decorations and different flavors but I thought that a rainbow cake is a very nice surprise. My first rainbow cake was for a very dear and special friend of mine. We met at Uni and we became close like family! My first attempt as you can see from the photos above was not the best but it did the trick! The secret of the rainbow cake is to decorate it with white icing so that the rainbows pop out as a surprise after it is cut! Seeing the look on his face was very rewarding. The kids present at his birthday party loved it so much that their mother asked me to bake one for her daughter's birthday and pay me at least 50 pounds for it!

Here is the recipe :)

Ingredients


Vegetable shortening
3 cups all-purpose flour
4 teaspoons baking powder
1/2 teaspoon salt
2 sticks (1 cup) unsalted butter, room temperature
2 1/3 cups sugar
5 large egg whites, room temperature
2 teaspoons pure vanilla extract
1 1/2 cups milk, room temperature
Red, orange, yellow, green, blue, and purple gel food coloring
  • Lemony Swiss Meringue Buttercream


  • Directions


    1. Preheat oven to 350 degrees. Brush six 9-inch-round cake pans (or as many 9-inch cake pans as you have, reusing them as necessary) with shortening. Line bottom of each cake pan with parchment paper; brush again and set aside.

    2. In a large bowl, whisk together flour, baking powder and salt; set aside. In the bowl of an electric mixer fitted with the paddle attachment, cream together butter and sugar. Slowly add egg whites and mix until well combined. Add vanilla and mix until fully incorporated. Add flour mixture and milk in two alternating additions, beginning with the flour and ending with the milk. Mix until well combined.

    3. Divide batter evenly between six medium bowls. Add enough of each color of food coloring to each bowl, whisking, until desired shade is reached. Transfer each color to an individual cake pan. Transfer to oven and bake until a cake tester inserted into the center of each cake comes out clean, about 15 minutes (working in batches if necessary).

    4. Remove cakes from oven and transfer to a wire rack; let cool for 10 minutes. Invert cakes onto a wire rack; re-invert and let cool completely.

    5. Using a serrated knife, trim tops of cakes to make level. Place four strips of parchment paper around perimeter of a serving plate or lazy Susan. Place the purple layer on the cake plate. Spread a scant 1 cup buttercream filling over the first layer with a small offset spatula so it extends just beyond edges. Repeat process with blue, green, yellow, and orange layers.

    6. Place the remaining red layer on top, bottom-side up. Gently sweep away any loose crumbs with a pastry brush. Using an offset spatula, cover the top and sides with a thin layer of frosting (also use any of the excess frosting visible between the layers). Refrigerate until set, about 30 minutes.

    7. Using an offset spatula, cover cake again with remaining frosting.


    After my first attempt I realized that the secret of this recipe is in putting it in the fridge or freezer after adding every filling layer and letting it cool for half an hour. This way it manages to stay taller and maintain its nice shape.


    Image
    Image
    Read More

    Perfect Crepe for a Perfect Morning ~ Recipe by Nigel Slater

    Image


    image: http://jackpot-84.deviantart.com/art/Bigoudens-84317486


    One of my favorite breakfast menus includes crepes. I have tried many recipes but all of them ended up a pancake/crepe hybrid. After extended research I have finally found a recipe for thin, moist and a bit crispy crepes. Nigel Slater seems to know his game and I will be forever grateful! http://www.guardian.co.uk/lifeandstyle/2002/feb/24/foodanddrink.recipes

    I know that most people prefer crepes with Nutella but my favorite sweet topping is lemon glazing. As for the savory I will have to go with feta, caramelized onions, tomato and olives!

    I will definitely try his pancake recipe as well.

    Makes about 12.

    50g butter, plus more for cooking 
    100g plain flour 
    1 large egg 
    1 large egg yolk 
    350ml milk

    Melt most of the butter in a small pan and leave it to cool slightly. Sift the flour into a large mixing bowl with a good pinch of salt. Scoop a well in the centre of the flour, then drop in the egg and the egg yolk. You can beat them lightly first, but I'm not sure it makes much difference. Pour in the milk, whisking gently as you go, then whisk in the melted butter. Set the batter aside for about half an hour.

    Melt some butter for frying. Heat an 18-20cm crepe pan and brush it with a little melted butter. Stir the batter - it should be the thickness of double cream - and pour 50-60ml into the pan. Working quickly, tilt the pan so that the batter runs all over the surface, making a neatish round. The base should be covered in batter, but not quite thin enough to see through.

    Let the crepe cook for a minute or so until the underside is golden in patches and comes easily away from the pan. Lift one edge up with a palette knife and flip it gently over. The base should be cooked in 1 minute, maybe less - but it will only cook in patches, not as evenly as the first side. Tip it carefully on to a plate. Brush the pan with a little more melted butter and continue until you have used all the batter.

    · For sweet pancakes, you can add 1 tbsp of caster sugar to the mixture and 2 tbsp of brandy. This will give a sweet, richer finish and is especially good for those who like their pancakes with cream or ice cream.
    Image

    image: http://xibalbapiixan.deviantart.com/art/Ingredientes-para-crepes-206681202
    Read More

    Tuesday 20 November 2012

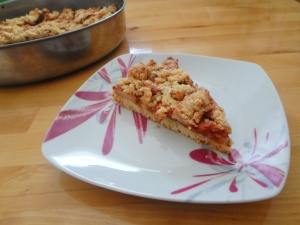
    Apple crumble pie


    These days the weather has been a bit gloomy and I was inclined for some cocooning and spending more time in the kitchen (other than heating frozen pies and pre-cooked meals What can I do, I do enjoy cooking, but efficiency and effectiveness come first :P).

    Anyway, this is a very easy recipe to follow and I’m sure it’s going to be your favorite type of apple pie. The crumble part of the pie has a delicious texture and you can still taste the chunks of apple in your mouth. Miam!

    Enjoy it devoted kurkubini readers!

    For the crumble dough:

    3 cups of white flour

    1 cup white sugar

    250g butter

    1 egg

    1 dose of baking powder

    For the stuffing:

    5-6 apples

    Sugar (~half a cup)

    Cinnamon

    A handful of raisins

    >>>>>>>>>>>

    Mix the flour with the baking powder and the sugar. Put in the butter in little pieces, the egg and mix this so that it has a “crumble” texture.

    Unpeel the apples and cut them into small slices. Sprinkle them with sugar, according to how sweet you want them to be. Sprinkle them with cinnamon and add the raisins.

    Take a round baking pan and cover it with some butter. Put in half of the crumble dough, then the apples’ mixture and cover with the other half of the dough.

    Bake in preheated oven for 40-50’ in 180 degrees Celsius.

    Good luck!
    Read More

    Tuesday 6 November 2012

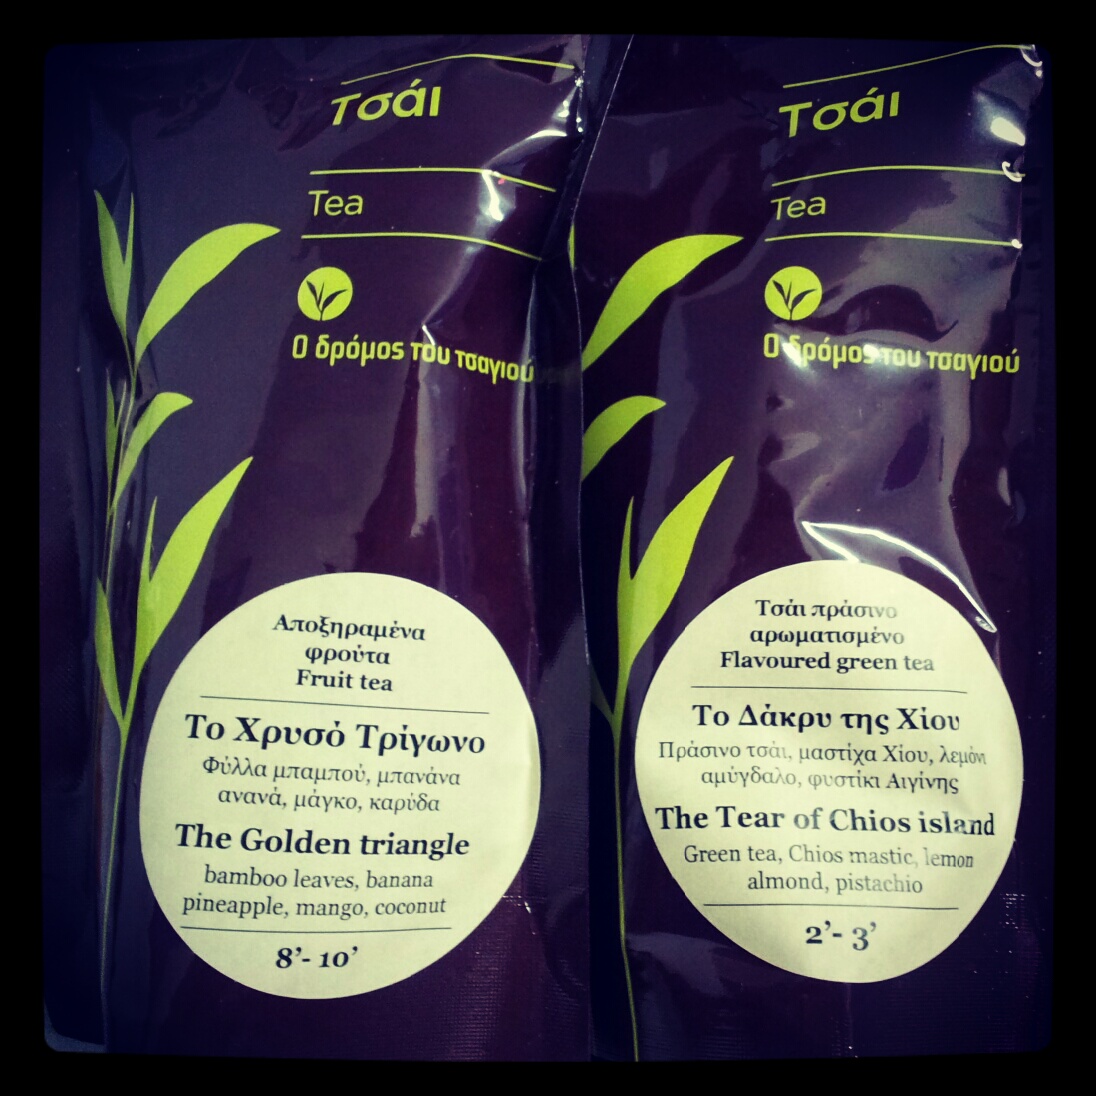
    The Tea Route ~ Ο Δρόμος του Τσαγιού


    ~ Ο Δρόμος του Τσαγιού

    This is a very different post as I want to talk about one of my favourite stores in Thessaloniki, a tea retailer. Maybe I am looking forward to my visit to Thessaloniki a bit too much. I have always been a fan of tea. I love the taste of coffee but unfortunately I can't take too much of it unless it is decaf which most of the times has no taste.

    My sister told me about this store Ο Δρόμος του Τσαγιού ~ The Tea Route and initially it was curiosity that drove me there. It is not in the Greek culture to drink tea. We love our mountain teas and herb teas especially when collected and dried by family members but we usually consume them for therapeutic purposes. Whenever I am asking my grandmother whether she would like a cup of tea the response I get is one and the same: 'Why? Am I ill and you are asking me?'.

    This little store close to the White Tower impressed me in a very good way and for a moment I thought I was either in China or UK. You are definitely spoiled for choice and the varieties of tea you can find there are one of a kind. I wanted something light and decaf so I went for the options in the photos. I loved them. I bought them last year during April and they still maintain the flavour in full! Everytime I drink a cup though I wish I had some cookies to go along with them. I have set myself a challenege, to try and find or experiment with cookie recipes that will complement the flavour of each tea.

    I am definitely looking forward to visiting the little store again, gearing up with different varieties and experimenting with recipes.

    For those that haven't visited the store yet and you happen to pass by Thessaloniki, I strongly reccomend it :)

    http://www.tearoute.gr/

    Chrisostomou Smirnis 12, 54622, Thessaloniki

    2310285559  /  2107221460


    Read More

    Sunday 4 November 2012

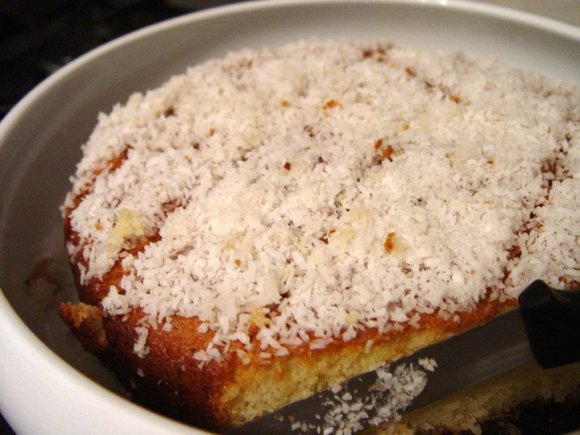
    Ravani with Coconut ~ Recipe by Parliaros

    Image

    Ραβανί με Καρύδα, συνταγή Παρλιάρου

    Another one of my favourite Greek delicacies is Ravani http://en.wikipedia.org/wiki/Basbousa. I know that nothing can be compared with the Ravani made in Veroia, Greece http://en.wikipedia.org/wiki/Veria.

    This recipe is from one of the most famous bakers in Greece, Parliaros http://www.parliaros.gr/. I love how he introduces traditional recipes in such an easy and approachable way while sharing secrets about spices to give small twists in well known desserts.

    Ingredients

    • 6 egg whites

    • 6 yolks

    • 140 gr sugar

    • 140 gr fine semolina

    • 70 gr all purpose flour

    • 50 gr coconut flakes

    For the syrup

    • 300 gr water

    • 300 gr sugar

    • 1 lemon

    • optional mastic essense

    • 100 gr coconut flakes to decorate

    Before starting we spread a thin butter layer around the bottom and edges of the baking tray we are going to use to bake the Ravani. We leave to cool in the fridge

    We beat the egg yolks with 100 gr of sugar in the mixer until fluffy and with a white color. We mix the flour and the semolina. We beat the egg whites with 40 gr of sugar in the mixer until it turns into a thick meringue. We mix softly in a bowl by hand half of the meringue with the beaten egg yolks. We slowly slowly add the flour and semolina mixture. We keep stirring softly and we finally add the rest of the meringue. Finally we add the coconut.

    We take the baking tray from the fridge and we spread a thin layer of flour. We empty the excess flour and then pour the mixture. We bake in a preheated oven 170 degrees C for 20-25 minutes.

    We take the Ravani out of the oven and we leave to cool down. In a pan we boil the water with the sugar and the lemon having it cut in half. For a twist we can add some mastic essence. After it starts boiling we leave it to boil for 3 minutes. As it is hot we pour it on the baked Ravani. We let it cool and serve after dusting with coconut.

    Video in Greek http://www.veoh.com/watch/v17502930hsrYmcdA?h1=Ravani+me+karyda
    Read More

    Friday 2 November 2012

    Greek Mpougatsa Thessalonikis With Creme


    ~ Μπουγάτσα Θεσσαλονίκης με Κρέμα

    Mpougatsa is one of the most famous Greek breakfast pastries in Northern Greece. It comes with different fillings creme, cheese, meat, spinach. It has somewhat made its way to the Southern parts of Greece but the Southerners don't seem to understand how it is different to their 'normal' and 'usual' cheese pastries.

    'History claims that ancients Greeks used to make pies with every kind of fealing called "placountas". Years went by and mpougatsa stayed popular in Constantinoupolis and Smyrna. Mpougatsa in Turkish means pie fealed with cream and topped with sugar powder and cinnamon powder. After the destroyal of Smyrna and the exchange of the Greek-Turkish colonies, mpougatsa became extremely popular in north Greece and especially Thessaloniki.' http://www.squidoo.com/mpougatsa-and-how-to-make-it
    It's one of my favorite morning treats and because I have missed it I decided to make myself! I added a special ingredient I adore to the recipe. Mastic 'spice' http://en.wikipedia.org/wiki/Mastic_(plant_resin)

    Unfortunately I don't think it can be found in any store outside Greece or Turkey.

    It is very easy to make and I would encourage you all to try baking it!

    Ingredients:

    • 500 gr filo pastry

    • 200 - 250 gr fine semolina (depending on how thick you want the creme. I love it thick so I used 250gr)

    • 250 - 400 gr sugar (depending on how sweet you would like it. I don't like very sweet desserts so I used 250 gr)

    • Vanilla essence

    • 300 gr butter

    • 1 1/2 litre milk

    • pinch of salt

    • few grams of mastic

    • Cinnamon and icing sugar to dust

    We heat the milk with the sugar, salt, mastic and vanilla essence. We stir until sugar is dissolved and ingredients mix well. We keep stirring until it comes to boil. We lower the temperature and we slowly slowly add the semolina. We keep stirring until it becomes a thick creme (for approximately 10 minutes). We withdraw the pan from the fire and we add 250 gr of the butter. We keep stirring until it dissolves and we let the creme cool. We preheat the oven on 180 degrees C.

    In a 34-36 cm long baking tray we layer 9 filos spreading a bit of butter in between. We make sure the filo runs outside the baking tray. We add the creme and we fold the parts of the filo outside the edges of the tray inwards so that they cover the creme. The point is to make sure the creme is safely contained in the filo so it doesn't run outside while baking. We cover with the rest of the filo pastry the same way spreading small quantities of butter in between.

    We bake for 30-40 minutes depending on the oven in the temperature of 180 - 200 degrees C.

    We serve dusting with icing sugar and cinnamon.

    basic recipe as seen in http://tokouzinakitispareas.blogspot.co.uk/2012/01/blog-post_12.html
    Read More

    Friday 12 October 2012

    Muffins with Feta Cheese and Onion


    Brought some feta from Greece and I wanted to bake some breakfast muffins with it. As lately I love adding onion almost to everything I looked for a recipe that combined feta with onions :) This is a very simple recipe as you simply mix the ingredients and put them in the oven. The less you work the mixture the better! Loved it! I think I will add some more salt in the muffin mixture and caramelise the onions next time while experimenting with some more spices and herbs!

    For the muffin mixture

    • 275 g plain flour

    • 1 tablespoon baking powder

    • 1 teaspoon salt

    • 1 egg

    • 225 ml milk

    For the cheese mixture

    • 1 tablespoon butter

    • 1 medium onion, finely chopped

    • 100 g feta cheese, chopped into small cubes

    • 1/2 tablespoon thyme

    • fresh ground black pepper

    • For eggwash

    • 1 egg, lightly beaten

    Directions:

    You will need a 12 hole mini-muffin tin.
    Melt the butter in a small saucepan, add in the chopped onion and cook for about 5 minutes till its softened and then remove from heat and leave it to cool.
    Once cool, add in the chopped feta cheese and rosemary and season with freshly ground black pepper (there is no need for salt since feta cheese is quite salty by itself) and give it a good mix.
    Pre-heat the oven to gas mark 6/400F/200°C.
    Next for the muffin base, sift the flour, baking powder and salt into a large mixing bowl.
    In another bowl beat the egg, then add in the milk and give it a good whisk again.
    Next, pour the egg mixture into the flour, using minimum number of folding movements (you should finish folding in 15 seconds and ignore the lumps in the mixture - do not overmix).
    Now gently add the onion mixture into the muffin mixture, folding in, as before, with as few strokes as possible.
    Arrange the muffin cases into the muffin tins them spoon the mixture into them.
    You may even spoon the mixture straight into the tins but they will have to be well-greased.
    Beat the second egg and brush the muffin tops with it.
    Bake them in the centre shelf of the oven for about 20 minutes, or until well risen and golden.
    Remove the muffins from the tins and serve immediately.

    http://www.food.com/recipe/savoury-muffins-with-feta-cheese-onion-and-rosemary-223382
    Read More

    Friday 5 October 2012

    Black Bottom Cupcakes

    Image

    Cinnamon rolls almost gone after just a day thus I had to bake something else as well. didn't have as much time so I thought of baking the simplest cake - cupcakes. As I wanted to try a new one even though my time was limited I went straight to Hummingbird recipes. They never fail me! Here is another delicious recipe for lovers of rich chocolate and cheesecakes...


    For the chocolate sponge base


    1. 190g plain flour

    2. 120g caster sugar

    3. 40g cocoa powder, plus extra to decorate

    4. ½ tsp bicarbonate of soda

    5. 40 ml sunflower oil

    6. 1½ tsps white vinegar

    7. ½ tsp vanilla extract


    For the cheesecake filling


    1. 140g cream cheese

    2. 60g caster sugar

    3. 1 egg

    4. ½ tsp vanilla extract

    5. A pinch of salt

    6. 100g milk chocolate chips


    For the cream cheese frosting300g icing sugar, sifted


    1. 300g icing sugar

    2. 50g unsalted butter, at room temperature

    3. 125g cream cheese, cold


    Method


    1. 1. Preheat the oven to 170°C (325°F) Gas 3. For the chocolate sponge base put the flour, sugar, cocoa powder and bicarbonate of soda in a large bowl and mix with a handheld electric whisk on slow speed until all the dry ingredients are well incorporated.

    2. 2. Put the oil, vinegar, vanilla extract and 125 ml water in a jug and whisk to combine. While the electric whisk is running in the flour bowl, slowly add the contents of the jug, increasing the speed of the blender as the mixture thickens. Continue to beat until all the ingredients are incorporated (scrape any unmixed ingredients from the side of the bowl with a rubber spatula).

    3. 3. Line a 12 hole cupcake tray with paper cases. Spoon the mixture into the paper cases until two-thirds full and set aside.

    4. 4. For the cheesecake filling beat together the cream cheese, sugar, egg, vanilla extract and salt in a freestanding electric mixer with a paddle attachment (or use a handheld electric whisk) on medium-slow speed until smooth and fluffy.

    5. 5. Stir in the chocolate chips by hand until evenly dispersed. Don’t overmix, otherwise the cream cheese will start to split.

    6. 6. Scoop about 1 tbsp of the cheesecake filling on top of the cupcake mixture and bake in the preheated oven for about 20 minutes, or until the cupcakes are firm to the touch and they have an even golden colour on the cheesecake filling. Don’t overcook as the cheesecake will become very dry and crumbly.

    7. 7. Leave the cupcakes to cool slightly in the tray before turning out onto a wire cooling rack to cool completely.

    8. 8. For the cream cheese frosting beat the icing sugar and butter together in a freestanding electric mixer with a paddle attachment (or use a handheld electric whisk) on medium-slow speed until the mixture comes together and is well mixed. Add the cream cheese in one go and beat until it is completely incorporated. Turn the mixer up to medium-high speed. Continue beating until the frosting is light and fluffy, at least 5 minutes. Do not overbeat, as it can quickly become runny.

    9. 9. When the cupcakes are cold, spoon the cream cheese frosting on top, if using, and decorate with a light sprinkling of cocoa powder.

    Read More

    Thursday 4 October 2012

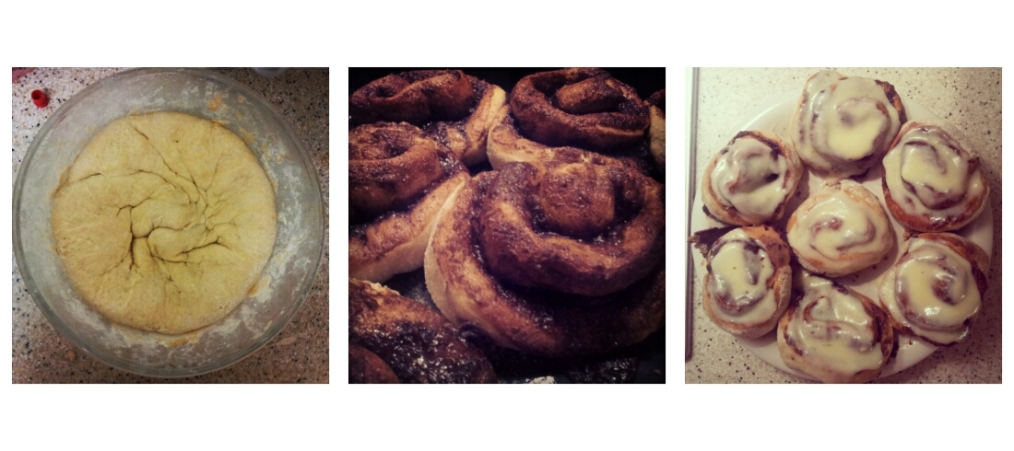
    Cinnamon Rolls

    Image

    And the new academic year has officially started! Cinnamon rolls have become a bit of a tradition here in the University of Warwick residences. My night boredom had always resulted in baking. But when you get the urge to start baking at around 9 in the evening it is normal to have the finished good around midnight. And as there is no point in baking without sharing it with others late night taster sessions at my flat had become a tradition! Cinnamon rolls seemed to have been the hit! After requests I am finally signalling the official start of the 2012-2013 Academic Year :)

    I tried a new recipe. Not my favourite I would say. I think next time I will have to try another one with a more flavoured dough. But here it is:

    Ingredients


    Makes: 16 cinnamon rolls


    • 4 tablespoons warm water

    • 50g butter, melted

    • 50g instant vanilla dessert, such as Angel Delight

    • 250ml warm milk

    • 1 egg, room temperature

    • 1 tablespoon caster sugar

    • 1/2 teaspoon salt

    • 550g bread flour

    • 1 (7g) sachet dried active baking yeast


    • 50g butter, softened

    • 150g dark brown soft sugar

    • 4 teaspoons ground cinnamon

    • 75g chopped pecans


    • 115g cream cheese, softened

    • 50g butter, softened

    • 120g icing sugar sugar

    • 1/2 teaspoon vanilla extract

    • 1 1/2 teaspoons milk


    Preparation method


    Prep: 2 hours | Cook: 20 mins


    1.

    In the pan of your bread machine, combine water, melted butter, vanilla dessert mix, warm milk, egg, 1 tablespoon sugar, salt, bread flour and yeast. Set machine to Dough cycle; press Start.


    2.

    When Dough cycle has finished, turn dough out onto a lightly floured surface and roll into a 40x25cm rectangle. Spread with softened butter. In a small bowl, stir together dark brown soft sugar, cinnamon and pecans. Sprinkle dark brown soft sugar mixture over dough.


    3.

    Roll up dough, beginning with long side. Slice into 16 slices and place in 20x30cm buttered tin. Let rise in a warm place until doubled, about 45 minutes. Meanwhile, preheat oven to 180 C / Gas 4.


    4.

    Bake in preheated oven for 15 to 20 minutes. While rolls bake, stir together cream cheese, softened butter, icing sugar, vanilla and milk. Remove rolls from oven and top with frosting.


    Read More

    Friday 21 September 2012

    With the help of a friend...

    image

    Baking not only relaxes me but I also find it a good opportunity to get creative with my friends.


    Being at my parents' house during my summer break a friend of mine presented me with a challenge. She claimed everything she baked came flat. I couldn't accept it so I encouraged her to bake one of the simplest treats. Cupcakes. I love Hummingbird Cupcake recipes and as her little one loves chocolate we chose the Chocolate Hazelnut Cupcake.
    She baked them herself with just a tiny encouragement from me. They were a success :-)


    Ingredients


    • 100g plain flour

    • 20g cocoa powder

    • 140g caster sugar

    • 1 1/2 tsp baking powder

    • a pinch of salt

    • 40gr butter, at room temp

    • 120ml milk

    • 1 egg

    • 120gr nutella

    • chopped hazelnuts to decorate


    For the icing


    • 250g icing sugar

    • 80g butter, at room temp

    • 25 ml milk

    • 80g nutella


    Method


    1. Preheat the oven to 170c


    2. Put the flour, cocoa powder, sugar, baking powder, salt and butter in a bowl and mix together. You can use an electric hand whisk for this. It should be a slightly sandy/grainy texture


    3. Pour the milk into the mixture and mix. Then add the egg and beat until it's all incorporated.


    4. Spoon the mixture into cupcakes cases in a muffin tin, filling to about halfway or 2/3 full. They rise quite a bit. Bake for 15-20 minutes.


    5. Leave to cool completely, then cut out a little circle in the cupcake. Pop the loose piece of cake out, insert a dollop of nutella, then put the cake piece back ontop so you have a filled cupcake.


    For the icing
    Mix all the above ingredients together until incorporated and continue mixing for about 5 minutes. The more mixing, the fluffier the icing! Use a palette knife to ice the cupcakes, then sprinkle with a bit of chopped hazelnut.


    http://afeitar.blogspot.co.uk/2009/03/chocolate-and-hazelnut-cupcakes.html

    Read More

    Apple Pie

    image


    Amongst the things that I am picky with is apple pies.


    I had some extra apples and was looking forward to baking a traditional one with thin pastry. I had done my research as always and found the perfect recipe when I realised I had almost run out of plain flour. I was left with a package of self raising one. I hate cake type apple pies. Somehow the combination of cake dough and apples doesn't match with my taste. Disappointed I couldn't accept my defeat so I was looking for a recipe that used self raising flour but not to make a cake dough.


    Luckily I found the following recipe. Loving amaretto I included it in the recipe to give an extra flavour and smell :-)


    Ingredients 


    Pastry


    • 300gr self-raising flour

    • 180gr butter

    • 180gr caster sugar

    • 2 eggs  lightly beaten

    • icing or caster sugar to dust


    Filling


    • 1kg apples – peeled, corded and sliced

    • 2 dsp water

    • 1 dsp lemon juice

    • 30gr caster sugar

    • 2tbsp Amaretto

    • Pinch cinnamon or clove – ground


    Method:


    1. Preheat the oven to 190 ˚C. Poach the apples gently in 2 dsp water a 1 dsp of lemon juice. Add sugar and spice to taste. Leave to cool.

    2. put the butter or margarine and sugar into a saucepan and heat gently until melted. Allow to cool.

    3. Add the lightly beaten eggs and the Neill’s Flour and bind the mixture into a soft dough. While the dough is still warm press two-thirds of it into the base of a greased 22cm pie dish.

    4. Spoon the cooled apples over the top. Shape the remaining pastry into 5 or 6 flattened rounds and arrange on top of the apples, ensuring the filling is well covered.

    5. Bake for 25 minutes until golden brown. Serve warm, dusted with icing or caster sugar.


    http://www.neillsflour.co.uk/bramleyapple.html

    Read More

    Saturday 24 November 2012

    Birthday Cake Recipes for Dear Friends - Rainbow Cake

    Image


    The most special birthday present is a hand-baked birthday cake. I was looking for the most unexpected birthday cake recipe and I came across the rainbow cake by Martha Stewart http://www.marthastewart.com/256688/rainbow-cake

    You can find plenty of nice ideas for birthday cake decorations and different flavors but I thought that a rainbow cake is a very nice surprise. My first rainbow cake was for a very dear and special friend of mine. We met at Uni and we became close like family! My first attempt as you can see from the photos above was not the best but it did the trick! The secret of the rainbow cake is to decorate it with white icing so that the rainbows pop out as a surprise after it is cut! Seeing the look on his face was very rewarding. The kids present at his birthday party loved it so much that their mother asked me to bake one for her daughter's birthday and pay me at least 50 pounds for it!

    Here is the recipe :)

    Ingredients


    Vegetable shortening
    3 cups all-purpose flour
    4 teaspoons baking powder
    1/2 teaspoon salt
    2 sticks (1 cup) unsalted butter, room temperature
    2 1/3 cups sugar
    5 large egg whites, room temperature
    2 teaspoons pure vanilla extract
    1 1/2 cups milk, room temperature
    Red, orange, yellow, green, blue, and purple gel food coloring
  • Lemony Swiss Meringue Buttercream


  • Directions


    1. Preheat oven to 350 degrees. Brush six 9-inch-round cake pans (or as many 9-inch cake pans as you have, reusing them as necessary) with shortening. Line bottom of each cake pan with parchment paper; brush again and set aside.

    2. In a large bowl, whisk together flour, baking powder and salt; set aside. In the bowl of an electric mixer fitted with the paddle attachment, cream together butter and sugar. Slowly add egg whites and mix until well combined. Add vanilla and mix until fully incorporated. Add flour mixture and milk in two alternating additions, beginning with the flour and ending with the milk. Mix until well combined.

    3. Divide batter evenly between six medium bowls. Add enough of each color of food coloring to each bowl, whisking, until desired shade is reached. Transfer each color to an individual cake pan. Transfer to oven and bake until a cake tester inserted into the center of each cake comes out clean, about 15 minutes (working in batches if necessary).

    4. Remove cakes from oven and transfer to a wire rack; let cool for 10 minutes. Invert cakes onto a wire rack; re-invert and let cool completely.

    5. Using a serrated knife, trim tops of cakes to make level. Place four strips of parchment paper around perimeter of a serving plate or lazy Susan. Place the purple layer on the cake plate. Spread a scant 1 cup buttercream filling over the first layer with a small offset spatula so it extends just beyond edges. Repeat process with blue, green, yellow, and orange layers.

    6. Place the remaining red layer on top, bottom-side up. Gently sweep away any loose crumbs with a pastry brush. Using an offset spatula, cover the top and sides with a thin layer of frosting (also use any of the excess frosting visible between the layers). Refrigerate until set, about 30 minutes.

    7. Using an offset spatula, cover cake again with remaining frosting.


    After my first attempt I realized that the secret of this recipe is in putting it in the fridge or freezer after adding every filling layer and letting it cool for half an hour. This way it manages to stay taller and maintain its nice shape.


    Image
    Image

    Perfect Crepe for a Perfect Morning ~ Recipe by Nigel Slater

    Image


    image: http://jackpot-84.deviantart.com/art/Bigoudens-84317486


    One of my favorite breakfast menus includes crepes. I have tried many recipes but all of them ended up a pancake/crepe hybrid. After extended research I have finally found a recipe for thin, moist and a bit crispy crepes. Nigel Slater seems to know his game and I will be forever grateful! http://www.guardian.co.uk/lifeandstyle/2002/feb/24/foodanddrink.recipes

    I know that most people prefer crepes with Nutella but my favorite sweet topping is lemon glazing. As for the savory I will have to go with feta, caramelized onions, tomato and olives!

    I will definitely try his pancake recipe as well.

    Makes about 12.

    50g butter, plus more for cooking 
    100g plain flour 
    1 large egg 
    1 large egg yolk 
    350ml milk

    Melt most of the butter in a small pan and leave it to cool slightly. Sift the flour into a large mixing bowl with a good pinch of salt. Scoop a well in the centre of the flour, then drop in the egg and the egg yolk. You can beat them lightly first, but I'm not sure it makes much difference. Pour in the milk, whisking gently as you go, then whisk in the melted butter. Set the batter aside for about half an hour.

    Melt some butter for frying. Heat an 18-20cm crepe pan and brush it with a little melted butter. Stir the batter - it should be the thickness of double cream - and pour 50-60ml into the pan. Working quickly, tilt the pan so that the batter runs all over the surface, making a neatish round. The base should be covered in batter, but not quite thin enough to see through.

    Let the crepe cook for a minute or so until the underside is golden in patches and comes easily away from the pan. Lift one edge up with a palette knife and flip it gently over. The base should be cooked in 1 minute, maybe less - but it will only cook in patches, not as evenly as the first side. Tip it carefully on to a plate. Brush the pan with a little more melted butter and continue until you have used all the batter.

    · For sweet pancakes, you can add 1 tbsp of caster sugar to the mixture and 2 tbsp of brandy. This will give a sweet, richer finish and is especially good for those who like their pancakes with cream or ice cream.
    Image

    image: http://xibalbapiixan.deviantart.com/art/Ingredientes-para-crepes-206681202

    Tuesday 20 November 2012

    Apple crumble pie


    These days the weather has been a bit gloomy and I was inclined for some cocooning and spending more time in the kitchen (other than heating frozen pies and pre-cooked meals What can I do, I do enjoy cooking, but efficiency and effectiveness come first :P).

    Anyway, this is a very easy recipe to follow and I’m sure it’s going to be your favorite type of apple pie. The crumble part of the pie has a delicious texture and you can still taste the chunks of apple in your mouth. Miam!

    Enjoy it devoted kurkubini readers!

    For the crumble dough:

    3 cups of white flour

    1 cup white sugar

    250g butter

    1 egg

    1 dose of baking powder

    For the stuffing:

    5-6 apples

    Sugar (~half a cup)

    Cinnamon

    A handful of raisins

    >>>>>>>>>>>

    Mix the flour with the baking powder and the sugar. Put in the butter in little pieces, the egg and mix this so that it has a “crumble” texture.

    Unpeel the apples and cut them into small slices. Sprinkle them with sugar, according to how sweet you want them to be. Sprinkle them with cinnamon and add the raisins.

    Take a round baking pan and cover it with some butter. Put in half of the crumble dough, then the apples’ mixture and cover with the other half of the dough.

    Bake in preheated oven for 40-50’ in 180 degrees Celsius.

    Good luck!

    Tuesday 6 November 2012

    The Tea Route ~ Ο Δρόμος του Τσαγιού


    ~ Ο Δρόμος του Τσαγιού

    This is a very different post as I want to talk about one of my favourite stores in Thessaloniki, a tea retailer. Maybe I am looking forward to my visit to Thessaloniki a bit too much. I have always been a fan of tea. I love the taste of coffee but unfortunately I can't take too much of it unless it is decaf which most of the times has no taste.

    My sister told me about this store Ο Δρόμος του Τσαγιού ~ The Tea Route and initially it was curiosity that drove me there. It is not in the Greek culture to drink tea. We love our mountain teas and herb teas especially when collected and dried by family members but we usually consume them for therapeutic purposes. Whenever I am asking my grandmother whether she would like a cup of tea the response I get is one and the same: 'Why? Am I ill and you are asking me?'.

    This little store close to the White Tower impressed me in a very good way and for a moment I thought I was either in China or UK. You are definitely spoiled for choice and the varieties of tea you can find there are one of a kind. I wanted something light and decaf so I went for the options in the photos. I loved them. I bought them last year during April and they still maintain the flavour in full! Everytime I drink a cup though I wish I had some cookies to go along with them. I have set myself a challenege, to try and find or experiment with cookie recipes that will complement the flavour of each tea.

    I am definitely looking forward to visiting the little store again, gearing up with different varieties and experimenting with recipes.

    For those that haven't visited the store yet and you happen to pass by Thessaloniki, I strongly reccomend it :)

    http://www.tearoute.gr/

    Chrisostomou Smirnis 12, 54622, Thessaloniki

    2310285559  /  2107221460


    Sunday 4 November 2012

    Ravani with Coconut ~ Recipe by Parliaros

    Image

    Ραβανί με Καρύδα, συνταγή Παρλιάρου

    Another one of my favourite Greek delicacies is Ravani http://en.wikipedia.org/wiki/Basbousa. I know that nothing can be compared with the Ravani made in Veroia, Greece http://en.wikipedia.org/wiki/Veria.

    This recipe is from one of the most famous bakers in Greece, Parliaros http://www.parliaros.gr/. I love how he introduces traditional recipes in such an easy and approachable way while sharing secrets about spices to give small twists in well known desserts.

    Ingredients

    • 6 egg whites

    • 6 yolks

    • 140 gr sugar

    • 140 gr fine semolina

    • 70 gr all purpose flour

    • 50 gr coconut flakes

    For the syrup

    • 300 gr water

    • 300 gr sugar

    • 1 lemon

    • optional mastic essense

    • 100 gr coconut flakes to decorate

    Before starting we spread a thin butter layer around the bottom and edges of the baking tray we are going to use to bake the Ravani. We leave to cool in the fridge

    We beat the egg yolks with 100 gr of sugar in the mixer until fluffy and with a white color. We mix the flour and the semolina. We beat the egg whites with 40 gr of sugar in the mixer until it turns into a thick meringue. We mix softly in a bowl by hand half of the meringue with the beaten egg yolks. We slowly slowly add the flour and semolina mixture. We keep stirring softly and we finally add the rest of the meringue. Finally we add the coconut.

    We take the baking tray from the fridge and we spread a thin layer of flour. We empty the excess flour and then pour the mixture. We bake in a preheated oven 170 degrees C for 20-25 minutes.

    We take the Ravani out of the oven and we leave to cool down. In a pan we boil the water with the sugar and the lemon having it cut in half. For a twist we can add some mastic essence. After it starts boiling we leave it to boil for 3 minutes. As it is hot we pour it on the baked Ravani. We let it cool and serve after dusting with coconut.

    Video in Greek http://www.veoh.com/watch/v17502930hsrYmcdA?h1=Ravani+me+karyda

    Friday 2 November 2012

    Greek Mpougatsa Thessalonikis With Creme


    ~ Μπουγάτσα Θεσσαλονίκης με Κρέμα

    Mpougatsa is one of the most famous Greek breakfast pastries in Northern Greece. It comes with different fillings creme, cheese, meat, spinach. It has somewhat made its way to the Southern parts of Greece but the Southerners don't seem to understand how it is different to their 'normal' and 'usual' cheese pastries.

    'History claims that ancients Greeks used to make pies with every kind of fealing called "placountas". Years went by and mpougatsa stayed popular in Constantinoupolis and Smyrna. Mpougatsa in Turkish means pie fealed with cream and topped with sugar powder and cinnamon powder. After the destroyal of Smyrna and the exchange of the Greek-Turkish colonies, mpougatsa became extremely popular in north Greece and especially Thessaloniki.' http://www.squidoo.com/mpougatsa-and-how-to-make-it
    It's one of my favorite morning treats and because I have missed it I decided to make myself! I added a special ingredient I adore to the recipe. Mastic 'spice' http://en.wikipedia.org/wiki/Mastic_(plant_resin)

    Unfortunately I don't think it can be found in any store outside Greece or Turkey.

    It is very easy to make and I would encourage you all to try baking it!

    Ingredients:

    • 500 gr filo pastry

    • 200 - 250 gr fine semolina (depending on how thick you want the creme. I love it thick so I used 250gr)

    • 250 - 400 gr sugar (depending on how sweet you would like it. I don't like very sweet desserts so I used 250 gr)

    • Vanilla essence

    • 300 gr butter

    • 1 1/2 litre milk

    • pinch of salt

    • few grams of mastic

    • Cinnamon and icing sugar to dust

    We heat the milk with the sugar, salt, mastic and vanilla essence. We stir until sugar is dissolved and ingredients mix well. We keep stirring until it comes to boil. We lower the temperature and we slowly slowly add the semolina. We keep stirring until it becomes a thick creme (for approximately 10 minutes). We withdraw the pan from the fire and we add 250 gr of the butter. We keep stirring until it dissolves and we let the creme cool. We preheat the oven on 180 degrees C.

    In a 34-36 cm long baking tray we layer 9 filos spreading a bit of butter in between. We make sure the filo runs outside the baking tray. We add the creme and we fold the parts of the filo outside the edges of the tray inwards so that they cover the creme. The point is to make sure the creme is safely contained in the filo so it doesn't run outside while baking. We cover with the rest of the filo pastry the same way spreading small quantities of butter in between.

    We bake for 30-40 minutes depending on the oven in the temperature of 180 - 200 degrees C.

    We serve dusting with icing sugar and cinnamon.

    basic recipe as seen in http://tokouzinakitispareas.blogspot.co.uk/2012/01/blog-post_12.html

    Friday 12 October 2012

    Muffins with Feta Cheese and Onion


    Brought some feta from Greece and I wanted to bake some breakfast muffins with it. As lately I love adding onion almost to everything I looked for a recipe that combined feta with onions :) This is a very simple recipe as you simply mix the ingredients and put them in the oven. The less you work the mixture the better! Loved it! I think I will add some more salt in the muffin mixture and caramelise the onions next time while experimenting with some more spices and herbs!

    For the muffin mixture

    • 275 g plain flour

    • 1 tablespoon baking powder

    • 1 teaspoon salt

    • 1 egg

    • 225 ml milk

    For the cheese mixture

    • 1 tablespoon butter

    • 1 medium onion, finely chopped

    • 100 g feta cheese, chopped into small cubes

    • 1/2 tablespoon thyme

    • fresh ground black pepper

    • For eggwash

    • 1 egg, lightly beaten

    Directions:

    You will need a 12 hole mini-muffin tin.
    Melt the butter in a small saucepan, add in the chopped onion and cook for about 5 minutes till its softened and then remove from heat and leave it to cool.
    Once cool, add in the chopped feta cheese and rosemary and season with freshly ground black pepper (there is no need for salt since feta cheese is quite salty by itself) and give it a good mix.
    Pre-heat the oven to gas mark 6/400F/200°C.
    Next for the muffin base, sift the flour, baking powder and salt into a large mixing bowl.
    In another bowl beat the egg, then add in the milk and give it a good whisk again.
    Next, pour the egg mixture into the flour, using minimum number of folding movements (you should finish folding in 15 seconds and ignore the lumps in the mixture - do not overmix).
    Now gently add the onion mixture into the muffin mixture, folding in, as before, with as few strokes as possible.
    Arrange the muffin cases into the muffin tins them spoon the mixture into them.
    You may even spoon the mixture straight into the tins but they will have to be well-greased.
    Beat the second egg and brush the muffin tops with it.
    Bake them in the centre shelf of the oven for about 20 minutes, or until well risen and golden.
    Remove the muffins from the tins and serve immediately.

    http://www.food.com/recipe/savoury-muffins-with-feta-cheese-onion-and-rosemary-223382

    Friday 5 October 2012

    Black Bottom Cupcakes

    Image

    Cinnamon rolls almost gone after just a day thus I had to bake something else as well. didn't have as much time so I thought of baking the simplest cake - cupcakes. As I wanted to try a new one even though my time was limited I went straight to Hummingbird recipes. They never fail me! Here is another delicious recipe for lovers of rich chocolate and cheesecakes...


    For the chocolate sponge base


    1. 190g plain flour

    2. 120g caster sugar

    3. 40g cocoa powder, plus extra to decorate

    4. ½ tsp bicarbonate of soda

    5. 40 ml sunflower oil

    6. 1½ tsps white vinegar

    7. ½ tsp vanilla extract


    For the cheesecake filling


    1. 140g cream cheese

    2. 60g caster sugar

    3. 1 egg

    4. ½ tsp vanilla extract

    5. A pinch of salt

    6. 100g milk chocolate chips


    For the cream cheese frosting300g icing sugar, sifted


    1. 300g icing sugar

    2. 50g unsalted butter, at room temperature

    3. 125g cream cheese, cold


    Method


    1. 1. Preheat the oven to 170°C (325°F) Gas 3. For the chocolate sponge base put the flour, sugar, cocoa powder and bicarbonate of soda in a large bowl and mix with a handheld electric whisk on slow speed until all the dry ingredients are well incorporated.

    2. 2. Put the oil, vinegar, vanilla extract and 125 ml water in a jug and whisk to combine. While the electric whisk is running in the flour bowl, slowly add the contents of the jug, increasing the speed of the blender as the mixture thickens. Continue to beat until all the ingredients are incorporated (scrape any unmixed ingredients from the side of the bowl with a rubber spatula).

    3. 3. Line a 12 hole cupcake tray with paper cases. Spoon the mixture into the paper cases until two-thirds full and set aside.

    4. 4. For the cheesecake filling beat together the cream cheese, sugar, egg, vanilla extract and salt in a freestanding electric mixer with a paddle attachment (or use a handheld electric whisk) on medium-slow speed until smooth and fluffy.

    5. 5. Stir in the chocolate chips by hand until evenly dispersed. Don’t overmix, otherwise the cream cheese will start to split.

    6. 6. Scoop about 1 tbsp of the cheesecake filling on top of the cupcake mixture and bake in the preheated oven for about 20 minutes, or until the cupcakes are firm to the touch and they have an even golden colour on the cheesecake filling. Don’t overcook as the cheesecake will become very dry and crumbly.

    7. 7. Leave the cupcakes to cool slightly in the tray before turning out onto a wire cooling rack to cool completely.

    8. 8. For the cream cheese frosting beat the icing sugar and butter together in a freestanding electric mixer with a paddle attachment (or use a handheld electric whisk) on medium-slow speed until the mixture comes together and is well mixed. Add the cream cheese in one go and beat until it is completely incorporated. Turn the mixer up to medium-high speed. Continue beating until the frosting is light and fluffy, at least 5 minutes. Do not overbeat, as it can quickly become runny.

    9. 9. When the cupcakes are cold, spoon the cream cheese frosting on top, if using, and decorate with a light sprinkling of cocoa powder.

    Thursday 4 October 2012

    Cinnamon Rolls

    Image

    And the new academic year has officially started! Cinnamon rolls have become a bit of a tradition here in the University of Warwick residences. My night boredom had always resulted in baking. But when you get the urge to start baking at around 9 in the evening it is normal to have the finished good around midnight. And as there is no point in baking without sharing it with others late night taster sessions at my flat had become a tradition! Cinnamon rolls seemed to have been the hit! After requests I am finally signalling the official start of the 2012-2013 Academic Year :)

    I tried a new recipe. Not my favourite I would say. I think next time I will have to try another one with a more flavoured dough. But here it is:

    Ingredients


    Makes: 16 cinnamon rolls


    • 4 tablespoons warm water

    • 50g butter, melted

    • 50g instant vanilla dessert, such as Angel Delight

    • 250ml warm milk

    • 1 egg, room temperature

    • 1 tablespoon caster sugar

    • 1/2 teaspoon salt

    • 550g bread flour

    • 1 (7g) sachet dried active baking yeast


    • 50g butter, softened

    • 150g dark brown soft sugar

    • 4 teaspoons ground cinnamon

    • 75g chopped pecans


    • 115g cream cheese, softened

    • 50g butter, softened

    • 120g icing sugar sugar

    • 1/2 teaspoon vanilla extract

    • 1 1/2 teaspoons milk


    Preparation method


    Prep: 2 hours | Cook: 20 mins


    1.

    In the pan of your bread machine, combine water, melted butter, vanilla dessert mix, warm milk, egg, 1 tablespoon sugar, salt, bread flour and yeast. Set machine to Dough cycle; press Start.


    2.

    When Dough cycle has finished, turn dough out onto a lightly floured surface and roll into a 40x25cm rectangle. Spread with softened butter. In a small bowl, stir together dark brown soft sugar, cinnamon and pecans. Sprinkle dark brown soft sugar mixture over dough.


    3.

    Roll up dough, beginning with long side. Slice into 16 slices and place in 20x30cm buttered tin. Let rise in a warm place until doubled, about 45 minutes. Meanwhile, preheat oven to 180 C / Gas 4.


    4.

    Bake in preheated oven for 15 to 20 minutes. While rolls bake, stir together cream cheese, softened butter, icing sugar, vanilla and milk. Remove rolls from oven and top with frosting.


    Friday 21 September 2012

    With the help of a friend...

    image

    Baking not only relaxes me but I also find it a good opportunity to get creative with my friends.


    Being at my parents' house during my summer break a friend of mine presented me with a challenge. She claimed everything she baked came flat. I couldn't accept it so I encouraged her to bake one of the simplest treats. Cupcakes. I love Hummingbird Cupcake recipes and as her little one loves chocolate we chose the Chocolate Hazelnut Cupcake.
    She baked them herself with just a tiny encouragement from me. They were a success :-)


    Ingredients


    • 100g plain flour

    • 20g cocoa powder

    • 140g caster sugar

    • 1 1/2 tsp baking powder

    • a pinch of salt

    • 40gr butter, at room temp

    • 120ml milk

    • 1 egg

    • 120gr nutella

    • chopped hazelnuts to decorate


    For the icing


    • 250g icing sugar

    • 80g butter, at room temp

    • 25 ml milk

    • 80g nutella


    Method


    1. Preheat the oven to 170c


    2. Put the flour, cocoa powder, sugar, baking powder, salt and butter in a bowl and mix together. You can use an electric hand whisk for this. It should be a slightly sandy/grainy texture


    3. Pour the milk into the mixture and mix. Then add the egg and beat until it's all incorporated.


    4. Spoon the mixture into cupcakes cases in a muffin tin, filling to about halfway or 2/3 full. They rise quite a bit. Bake for 15-20 minutes.


    5. Leave to cool completely, then cut out a little circle in the cupcake. Pop the loose piece of cake out, insert a dollop of nutella, then put the cake piece back ontop so you have a filled cupcake.


    For the icing
    Mix all the above ingredients together until incorporated and continue mixing for about 5 minutes. The more mixing, the fluffier the icing! Use a palette knife to ice the cupcakes, then sprinkle with a bit of chopped hazelnut.


    http://afeitar.blogspot.co.uk/2009/03/chocolate-and-hazelnut-cupcakes.html

    Apple Pie

    image


    Amongst the things that I am picky with is apple pies.


    I had some extra apples and was looking forward to baking a traditional one with thin pastry. I had done my research as always and found the perfect recipe when I realised I had almost run out of plain flour. I was left with a package of self raising one. I hate cake type apple pies. Somehow the combination of cake dough and apples doesn't match with my taste. Disappointed I couldn't accept my defeat so I was looking for a recipe that used self raising flour but not to make a cake dough.


    Luckily I found the following recipe. Loving amaretto I included it in the recipe to give an extra flavour and smell :-)


    Ingredients 


    Pastry


    • 300gr self-raising flour

    • 180gr butter

    • 180gr caster sugar

    • 2 eggs  lightly beaten

    • icing or caster sugar to dust


    Filling


    • 1kg apples – peeled, corded and sliced

    • 2 dsp water

    • 1 dsp lemon juice

    • 30gr caster sugar

    • 2tbsp Amaretto

    • Pinch cinnamon or clove – ground


    Method:


    1. Preheat the oven to 190 ˚C. Poach the apples gently in 2 dsp water a 1 dsp of lemon juice. Add sugar and spice to taste. Leave to cool.

    2. put the butter or margarine and sugar into a saucepan and heat gently until melted. Allow to cool.

    3. Add the lightly beaten eggs and the Neill’s Flour and bind the mixture into a soft dough. While the dough is still warm press two-thirds of it into the base of a greased 22cm pie dish.

    4. Spoon the cooled apples over the top. Shape the remaining pastry into 5 or 6 flattened rounds and arrange on top of the apples, ensuring the filling is well covered.

    5. Bake for 25 minutes until golden brown. Serve warm, dusted with icing or caster sugar.


    http://www.neillsflour.co.uk/bramleyapple.html

    Featured Posts

    © 2011 Kurkubini, AllRightsReserved.

    Designed by ScreenWritersArena